Intro
For some time I have owned a Uradmonitor model A unit. This is a radiation monitoring solution which measures radiation and makes it available on a website. Connect it to your local network, and it will automatically get an IP address and start logging to www.uradmonitor.com. There you can find the stations and associated readings on a map.
Since the Uradmonitor has a webinterface it is easy to scrape the data and send it elsewhere. For example, the CPM can be displayed on a VFD display or displayed in domotics applications.
At home I try to make any sensor reading available using Mosquitto/MQTT. It is a lightweight, easy to use protocol to distribute dynamic data. Besides the Uradmonitor, multiple NodeMCU ESP8266 units running ESP Easy publish their sensor readings to the local MQTT server. All of this is done by Mosquitto running on my Debian ARM NAS and a Raspberry Pi running Raspbian and Pimatic.
Scraping and publishing to MQTT
First off I scrape the data from the Uradmonitor webpage using curl. Then, after some awk and html2text processing it is published to my local MQTT server using the mosquitto_pub MQTT publishing client.
#!/bin/bash
uradmonitorcpm=$(curl -s http://<ip of uradmonitor/ | html2text | grep radiation | egrep -o '[0-9.]*')
mosquitto_pub -m $uradmonitorcpm -t /uradmonitor/cpm
This bash script runs every minute using /etc/crontab and updates the local MQTT server with the latest measurement. The command ends with the MQTT topic which is the “address” of the dynamic value on the MQTT server. Please note that mosquitto_sub does not need an IP address when publishing to localhost/127.0.0.1 since that is a default of the client. To specify a host, use the -h <ip address of mqtt server> option.
Once data is published on the MQTT server you can access it anywhere you want, depending on access rules and NAT entries on your router. To test it use the following command and watch the data being published to the server:
johan@myserver:~$ mosquitto_sub -v -t /#
/Aquarium/room_temp/Temperature 20.12
/Aquarium/dht22_1/Temperature 22.60
/Aquarium/dht22_1/Humidity 43.30
/uradmonitor/cpm 26
/Outside/water/Temperature 22.50
/Outside/outside/Temperature 22.19
/Outside/dht22_1/Temperature 5.00
/Outside/dht22_1/Humidity 33.50
Pimatic configuration
The domotics software Pimatic has MQTT support so it is quite easy to display information published to MQTT. Stop the pimatic service and add the following to the config.json file:
Under plugins:
 {
      "plugin": "mqtt-simple"
    }
Under devices:
 {
      "class": "MqttSimpleSensor",
      "id": "Uradmonitor",
      "name": "Uradmonitor",
      "mqtturl": "mqtt://<ip address of mqtt server>",
      "attributes": [
        {
          "name": "cpm",
          "topic": "/uradmonitor/cpm",
          "type": "number",
          "unit": "cpm",
          "acronym": "cpm"
        }
      ]
    }
Please note that depending on other items you have in the configuration it may be neccesary to add a comma when the added items are the last in the list of items under plugins or devices. Restarting Pimatic could take a while as it downloads the MQTT plugin from a repository. To watch this process use tail -f pimatic-app/pimatic-daemon.log to check it’s startup and running log.
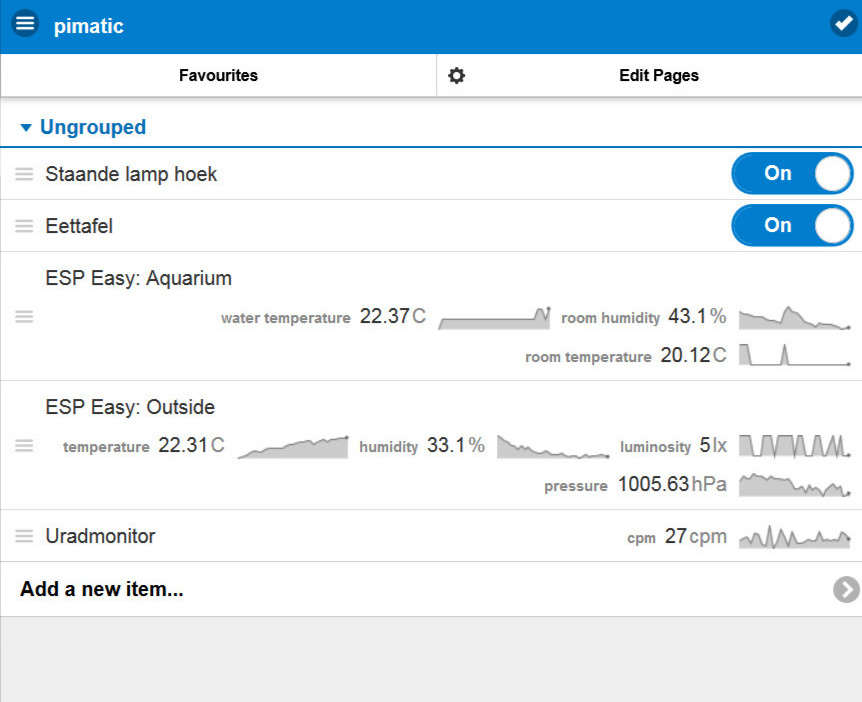
Restart Pimatic and if everything works OK it should show up like this:
Other MQTT niceness
Once data is published to MQTT you can do whatever you want with it. The excellent python script mqttwarn can interface with any thinkable online service. Tweet a temperature or geiger counter reading? Send an e-mail if nuclear broke out? Anything is possible! 🙂