• Category Archives english
  • Trinket powered geiger counter

    Lately I have been messing around a bit with microprocessor powered geiger counters. One smart guy came up with the idea of generating high voltage using PWM signals from the microprocessor itself. With some additional external parts a HV supply and negative going pulse suitable for microprocessors is easy to make. Here is a schematic I came up with:

    gm counter interface

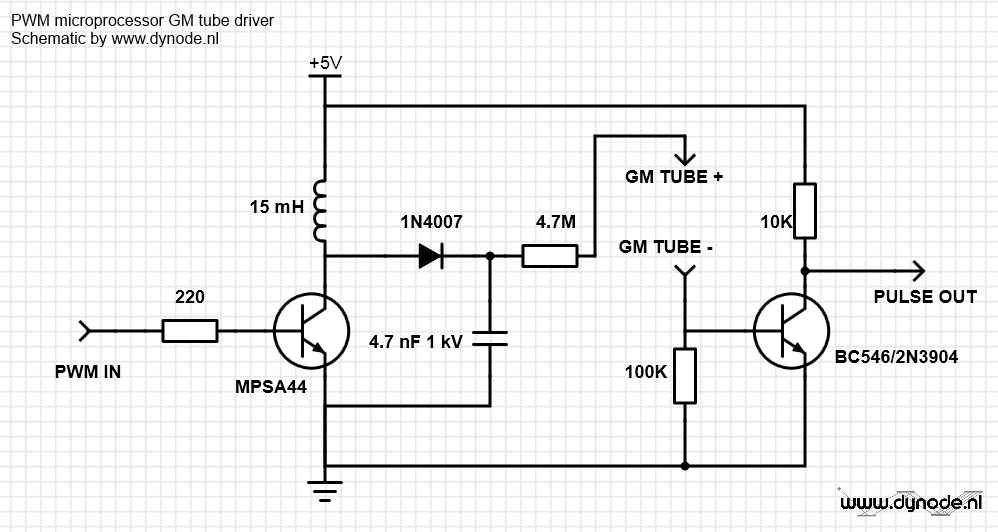
    The circuit works as follows: A ~1 Khz squarewave turns the MPSA44 high voltage transistor on and off, generating high voltage when the  inductors current is shut off. The voltage depends on the pulse width of the square wave which can be tweaked in software. The 1N4007 diode rectifies this voltage, and the HV cap removes most of the ripple on this voltage. The resistor limits current to the GM tube. The current pulses from the tube generate a voltage drop over the 100K resistor which turns on the BC546. When this happens the voltage through the 10K resistor is pulled to ground, generating a negative going pulse each time the GM tube detects an ionizing ray or particle.

    To drive this circuit I used my new Adafruit Trinket, a small board with a Attiny85 microprocessor. Using the tutorials on the Adafruit website it is easy to work with from the Arduino environment. Here is the code:

    void setup() {
     analogWrite(0, 30); //starts PWM on pin 0, generates about 400V
     analogWrite(1, 255); // needed to get LED to full brightness
     attachInterrupt(0,countPulse,FALLING); // attach interrupt to pin 2
     }
    void loop() {
     //nothing much really
     }
    void countPulse(){
     //pulse led
     digitalWrite(1, HIGH);
     delay(100);
     digitalWrite(1,LOW);
     }

    And here is a video of the setup in use:


    Of course it is rather wasteful to only use the microprocessor to generate PWM and flash a LED. I plan on implementing counting and serial output in software later. Unfortunately the Trinket does not have native serial USB capability but bit banging a serial signal on one of the pins should work fine according to several sites. Then it is just a matter of adding a cheap PL2303 serial to USB adapter.

    Update 18/4/2014

    Added serial logging capability. Using a tx only software serial library, the Trinket outputs the measurements in CPM each 10 seconds on pin 4. New code:

    // Trinket GM counter by Johan/dynode.nl
    
    //counting vars
    long count = 0;
    long countPerMinute = 0;
    
    // init softserial only tx on pin 4
    #include <SendOnlySoftwareSerial.h>
    SendOnlySoftwareSerial mySerial (4);
    
    void setup() {
      mySerial.begin(9600); // init serial 9k6
      analogWrite(0, 30); //starts PWM on pin 0, generates about 400V
      analogWrite(1, 255); // needed to get LED to full brightness
      attachInterrupt(0,countPulse,FALLING); // attach interrupt to pin 2
      mySerial.println ("Trinket GM counter starting..."); 
    }
    
    void loop() {
      delay(10000); //the count is incrementing during this delay
      countPerMinute = 6 *count;
      mySerial.println (countPerMinute);
      count=0; //reset the count
    }
    
    void countPulse(){
        count++;
        //pulse led when count is increased
        digitalWrite(1, HIGH);
        delay(100);
        digitalWrite(1,LOW);
      }

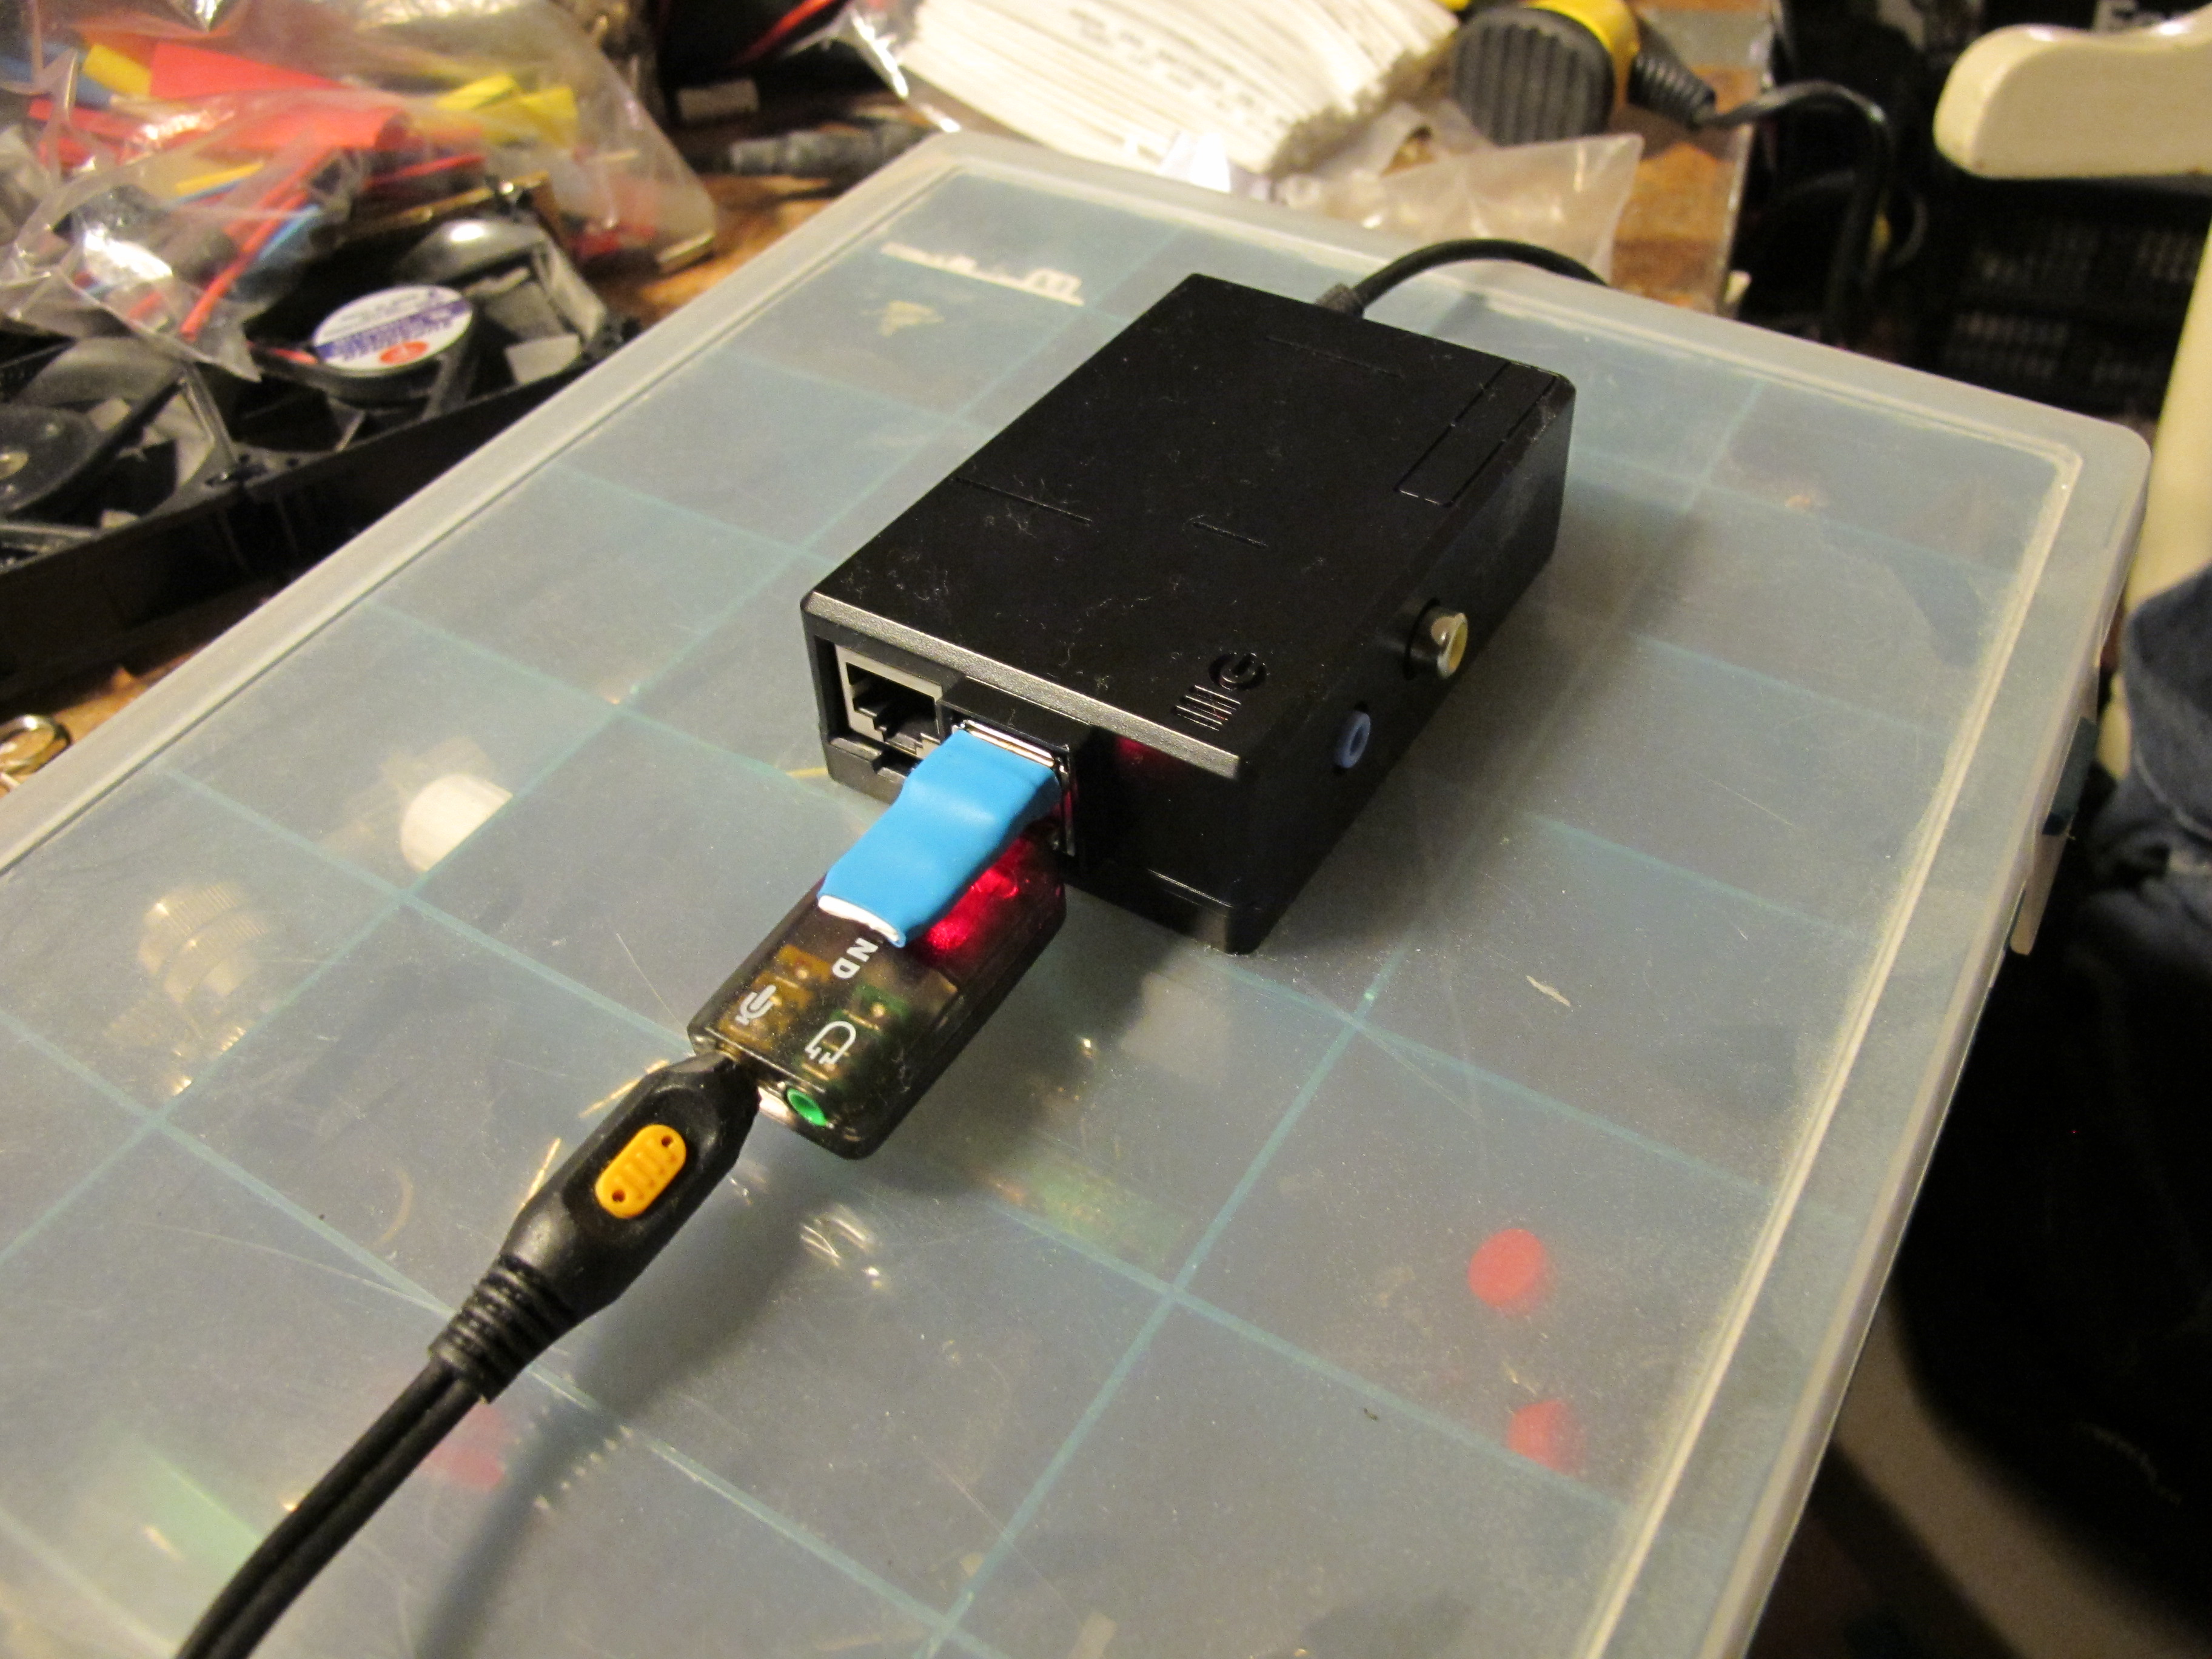
    Example serial output using cheap eBay USB<>TTL serial adapter:

    Trinket GM counter starting...
    84
    12
    6
    0
    402        <--- thorium bearing mantle held next to GM tube
    996
    1218
    1146
    1074
    1104


    There still need to be some tweaking done, the circuit is quite susceptible to electromagnetic interference which causes erroneous counts.


  • Streaming radio receivers with the Raspberry Pi

    rpi_audio_stream

    The Raspberry Pi is a small computer that has become very popular. Lots of applications and hardware hacks have been made for it. You can run various software like web/file/printservers, read out sensors, the possibilities are endless.

    I own multiple Raspberry Pi’s, one is a test platform for sensors, and a new one pictured above will be dedicated to audio streaming. I use the software packages darkice and icecast2 to capture the audio from an USB audio card and make it available on the internet.

    To stream audio with the RPi you’ll need the following hardware and software: Continue reading  Post ID 1377


  • PMTs and scintillation probes

    quickprobe

    temporary probe with NaI(Tl) crystal, PMT, socket with voltage divider and BNC socket

    Following is a little guide to using photomultiplier tubes in DIY scintillation probes.

    Photomultipliers are vacuum tubes that convert light into electrons and multiply the resulting current up to millions of times. They are used to detect the minute flashes of light generated by scintillators, materials that convert gamma and x-rays into visible light.

    How to use these tubes? There are some things you need to remember when working with PMTs.

    Continue reading  Post ID 1377


  • Eye/oog update

    Posted on by Johan

    English follows below…

    Straks gaat er een ondertekende brief de deur uit en geef ik akkoord voor een behandeling aan mijn linkeroog en medewerking aan een wetenschappelijk onderzoek.

    Mijn linkeroog gebruik ik al tijden niet meer door lensintolerantie en ik zou graag weer eens met beide ogen willen zien.

    Volgens de oogarts is het voor mijn linkeroog mogelijk om een gedeeltelijke hoornvliestransplantatie (DALK) uit te voeren waarbij het achterste laagje, het endotheel, behouden zal blijven. Dit heeft een aantal bijzondere voordelen, de wond zal beter helen, de kans op afstoting is lager en het resultaat is duurzamer dan de transplantatie van de gehele dikte zoals in mijn rechteroog.

    Het wetenschappelijke onderzoek  gaat bekijken of een bepaalde methode om laagjes hoornvlies te scheiden voordelen biedt ten opzichte van de traditionele methodes. Dit is belangrijk, want bij DALK operaties komt het bij een vijfde van de operaties voor dat men de laagjes niet goed kan scheiden en dat men toch een ouderwetse transplantatie van de gehele dikte van het hoornvlies moet uitvoeren.

    Nu is het dus wachten op de operatie, een groffe indicatie van de arts is een half jaar. Uiteraard zal ik na de operatie weer de gebruikelijke updates geven.

    Continue reading  Post ID 1377


  • Raspberry Pi remote sensors

    Posted on by Johan

    I recently bought a Raspberry Pi to experiment with. The first things I did with it was connecting and reading out Maxim Integrated DS1820 one wire temperature sensor and the cheap Chinese DHT11 temperature / relative humidity sensor.

    To connect the sensors, I soldered some female pin headers to a piece of PCB. For the one wire network I soldered a 4.7K resistor between Vcc on pin1 (3.3V) and GPIO4 on pin 7. GPIO4 is the data pin for one wire, I used GPIO2 as the data pin for the DHT11.  DHT11 “modules” with a PCB and three pins have their own pull up resistor, the separate 4 pin sensors don’t. Shown below is the quick setup, I soldered the DS1820 directly to the PCB, and connected the DHT11 with some wires for 3.3V, data and ground.

    rasp_gpio_ds1820_dht11


    GPIO pinouts differ between the Raspberry Pi versions, I found the following pinout to be correct for my Raspberry Pi, a model A version 2.

    Reading out the sensors is easy. For the DS1820, load the required kernel modules which are included in the Raspbian Linux distribution: Continue reading  Post ID 1377